Privacy policy

Showing posts with label die cut. Show all posts

Friday, 23 November 2018

Blue houses made with Artful Dwellings die


Christmas is definitely coming now. Christmas lights have been turned on and Santa is in his grotto in town. I have started making my presents now which are increasingly handmade. I think the older I get the less interested I am in buying more 'stuff' for people or myself. There is so much mass produced nonsense available and things all start to look the same in the shops. A handmade gift is always unique and has much more meaning. You are giving your time, sharing your imagination and creativity. You are sharing your sense of that person as you make something that is just right for them. I think it is time well spent and much more fun than Christmas shopping.


I usually come up with ideas for a few types of  gifts that suit lots of my friends and family. I have started off with an accordion that can be a decoration for Christmas, an elaborate card or an all year decoration.  Once its folded up it is also is very easy to post. This is great for people overseas. Having lived in England Australia and Canada I post a lot at Christmas.


I used the Tim Holtz Artful Dwellings die to cut coloured card stock in a range of blues. Each house shape was cut individually using a piece of card accordion folded so it lay just inside the edge of the cutting blade on both sides. This way the top and bottom cuts through but the two side edges are left intact to produce a connected continuous row of houses. Once I had lots of the four different shapes cut out I had a stamping feast. Using lots of blue inks including, Versamark Momento, regular Distress, Archival and  Powder Puffs chalk ink.

The edges are all distress inked to finish off. I think I might add some treasure gold or silver to some of them to make them more festive. I didn't want them to be Christmas themed as it seems a shame to have to put them away most of the year, I think the blues give them a wintery feel.

The rows are all the same shape but I overlapped them and glues different shapes together to produce a few sets that were longer and mixed up the house shapes. 

I really enjoyed making these and it gave me a chance to use lots of lovely stamps that have been neglected, I think I will do some more Christmas coloured sets next and use lots of my Christmas stamp sets. My non crafting friends often complain about the Christmas preparation and think I begin  very early but I think anyone who enjoys crafting knows it is a joy to have such a wealth of reasons to spend more time at my desk. Hope you are getting lots of time at yours too.


I'm linking up with:

Happy Little Stampers  November  anything Goes With a Die Challenge. This challenge always gives me a great prompt to get out my old dies.
and Frilly and Funkie whose latest challenge is "Tis the season for gift giving."

Sunday, 23 September 2018

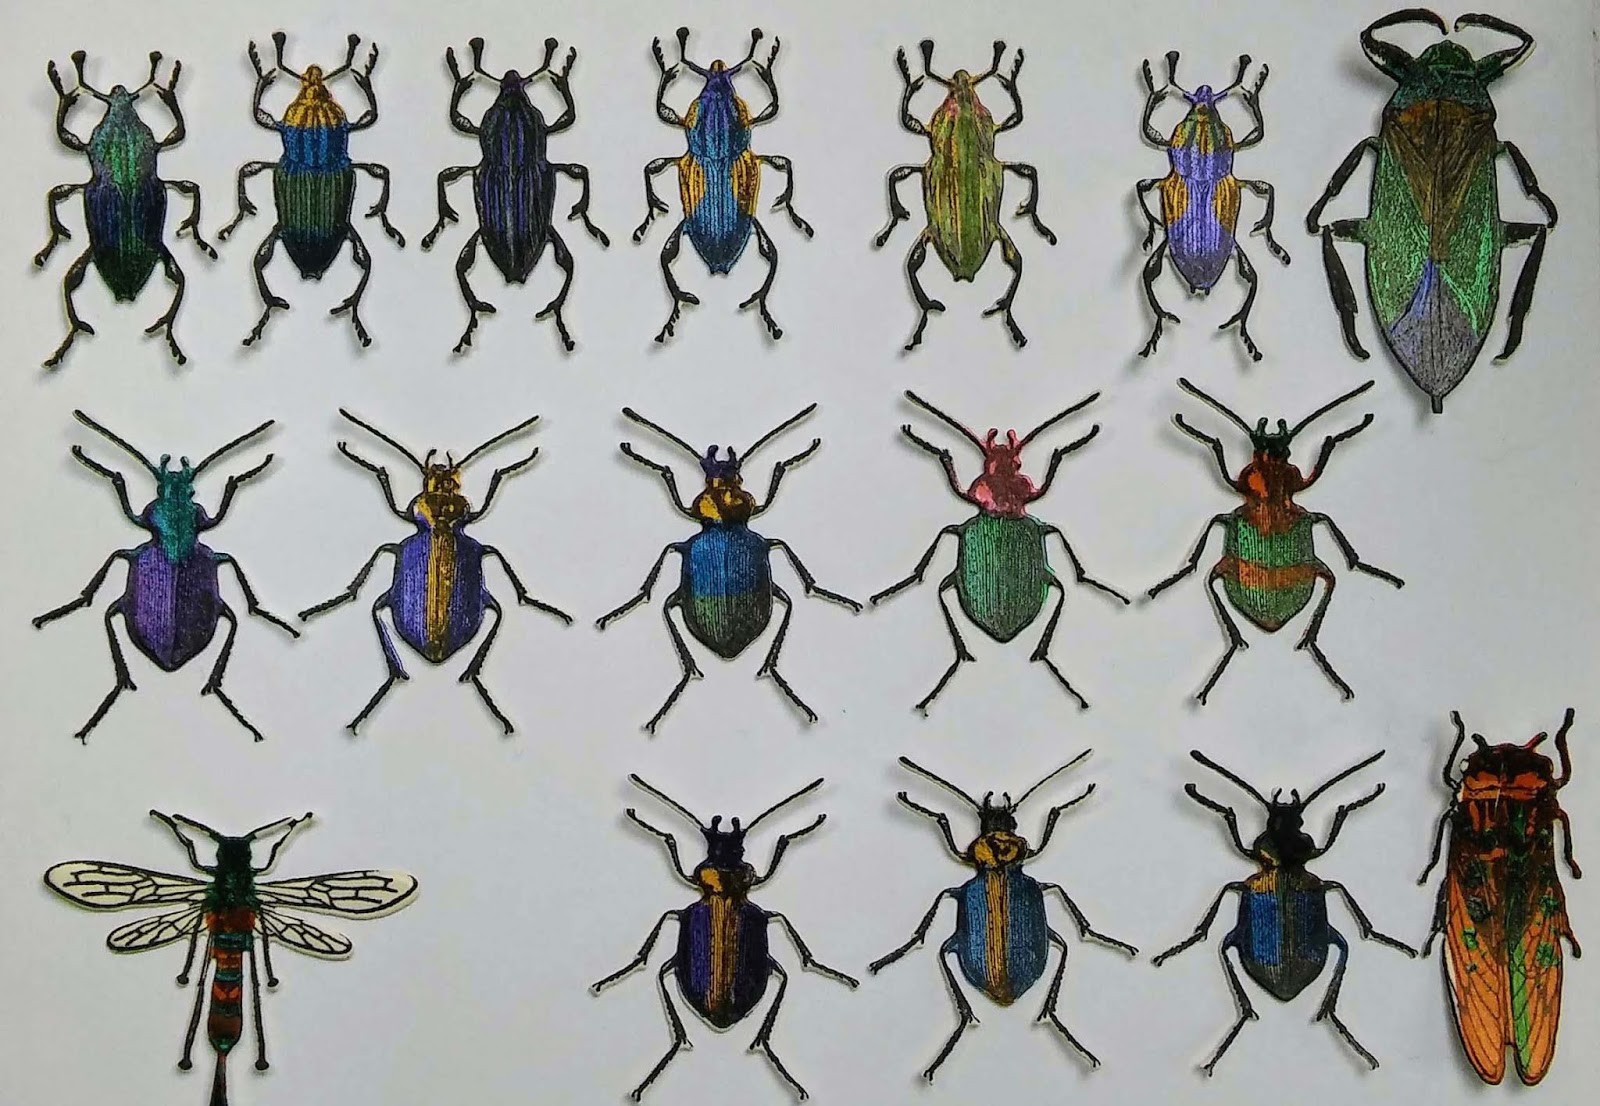
Tim Holtz Entomology dies and stamps

I was excited when Tim Holtz brought out the Entomology stamp set not only did it have a really useful text stamp it had lots of insect that look like they were taken from vintage engraved illustrations. I have posted a  bug box project made with the set. I was quite happy to fussycut this single bug but it would have been very easy to chop off a leg or two so I am delighted Tim has brought out a set of Framelits to go with this set. I have been playing and experimenting for most of this week in my spare moments. I thought I would share a few tips and lots of lovely bugs before they crawl off into a project.


I tried the bee first as who doesn't love bees. I wanted to see if it worked with just the normal two plates in a single pass. As I expected it did not cut cleanly but you are recommended to use a precision plate with intricate dies and these are very intricate. Next I used my Bigshot and a Cherry Lynne metal precision shim plate.  I cut all of the bugs in a single pass. They all cut perfectly with no difficulty popping them out.


I cut out eight more bees and each one worked perfectly. The dies are amazing my best buy in ages.


To get the best alignment for all the legs and antenna use the tiny holes at the end of each one and try and line them up so you see black through every hole. This worked perfectly 98% of the time. Any tiny white edges can be inked with a touch of distress black soot. I wanted to see them coloured so I got out lots of different paints, and Perfect Pearls. On a piece of cream card I drew around the dies and painted lots of the bodies. Once they dried I stamped over them and ran them through the big shot using the framlits. It is hard to colour them this way and achieve perfectly placed colours but I did want to try out lots of the materials I had.


A more precise colouring is possible if you stamp in black archival ink, heat emboss and then colour with markers or use a fine brush with inks or nice fluid paint.


Now I have a bug collection to play with.


Tuesday, 14 August 2018

I Dreamt I Dwelt In Marble Halls


Frilly and Funky has been challenging us to make something using some type of marble effect, arches or columns. I managed to include all three.


I was interested to see if I could make a marble effect with distress ink. The green patterned paper I used has a faint crackle design. I put several colours of distress ink onto my craft mat and spritzed it once or twice then applied it to the paper using a crunched up cellophane bag. I mopped off any dark spots immediately so the effect was quite soft. Then I stamped a tiny hint of cracks using some of the dark green distress ink from my mat. My arch was cut with a Movers and Shapers die creating two openings in a three fold card.


I have managed to get columns in on the front using a lovely old stamp by Beeswax. On the other two panels I stamped small areas of Latin text and some stonework in Watering Can Archival ink


I wanted to use one of the arches cut from the paper to make a kind of Roman icon image on the back section. I have tried gilding random areas on previous projects but for this I wanted to try and make a totally gold background around a stamped image. First I stamped the image in black archival ink. Then I carefully painted size all around it with a very fine brush. The size is like a tacky glue. The idea is that the gilding should only stick to the sized areas around the image.


Next I applied an imitation gold leafing sheet right over the whole thing. Then I wiped away the gold leafing in the image area (I used my fingers as I was wearing cotton gloves for the process). And Yay it worked!


Finally I coloured the image with distress ink mixed with a little water. Again I used a very fine brush. I love the delicate effect of distress colouring with the lush gilding. I think it adds a real touch of magic to the image which has the drama and mystery of all Lynne Perrella's stamps. The finished 'Roman icon' is coated with a glaze to stop the gold leaf from tarnishing (you don't need to glaze real gold leaf only the imitation stuff).


This stamp is called Sweetbriar which is the name used for Sleeping Beauty in lots of traditional versions of the Grimm's fairytale. I wanted this fairy tale woman to be surrounded by tendrils of ivy. My ivy leaves are die cut from green patterned paper and darkened with green distress inks.


The leaves are shaped on a foam mat and then glued individually on top of the stems (cut from a branch die) on the front and back panel. The figure can then be viewed though the ivy arches.


The edges have a tiny touch of texture and glint from a mix of embossing powders (Ranger Antiquities California Stucco, clear and regular gold powders, and some Stampendous Frantage Aged Silver). I often combine my powders to create something that tones in with my project. I love the way the frantage leaves big splatters of gold randomly over the paper.


I really enjoyed making this card and following my inner fairytale.


I am linking this card to Frilly and Funkie's challenge

And also
Stamping Sensations who are challenging you to Use your 'current' favorite stamp.
The Artistic Stamper  whose August Cretive Callenge is anything goes so long as a stamp is the centre of your project and for me it usually is.

Stamps used:
Latin Text from Woodware
Stones from Paperartsy - Architecture Plate 3 (Ink and the Dog A6)
Arches  from Beeswax
Sweetbriar Lynne Perrella stamp by Stampington

Dies used:
Sizzix Susan's Garden Thinlits set "Leaves, Fern & Ivy"
Memory Box Graceful branch oval
Sizzix Tim Holtz Movers and Shapers sized arch

Sunday, 5 August 2018

Oxide Ink birthday card

Got out some of my oxide inks to make a quick birthday card with a Crafty Individuals stamp set I love using. This card is intended for an Irish friend whos turning 60. Hares have a special place in Celtic mythology and are seen as magical and wise animals. In my mind anyone reaching 60 has the right to be considered very wise. The hares in these stamps are quirky but suggest the intelligence I equate with these animals.


I did start photographing the process while I began with smooshing oxide ink onto my mat and misting and dipping. I made a few extra pieces at the same time to use for my hares and sentiments.


Then some stencilling. I stencilled circles and then wet them and removed some ink to get a subtler effect.


At this point I got distracted and forgot to photograph for a while. I added some numbers using a stencil and Peacock Feathers oxide ink. Next I stamped a some random text in Manganese Blue archival ink. Happy now with my background  I stamped plants at the bottom in Potting Shed  Archival ink. I used the same ink to stamp the two lovely hares onto one of my spare background pieces and then fussycut them and edged them in brown distress ink. I had a little fun creating some embossing powder from a mixture of ancient antiquities Verdigris and Frantage Aged Aqua embossing enamel. I love the large white pieces that create a kind of splatter and it has also has blue glitter for a little magic. I stamped sentiments on more of my spare background peices and edged them with the embossing mixture. When I arranged them I decided it looked far too busy. Instead I used a small circle die to cut a hole in my card. Then I mounted the card on a larger peice of teal cardstock.


I die cut number 60 from spare smooched paper and glued it into the teal circle. The finished card front is attached to a pale blue card base and the sentiments are all stamped inside. It looks a little like hares are gazing up at a blue moon.


After choosing hares for their magical qualities I had to join in with the August challenge at That's Crafty whose theme is "Animal Magic."

I also think hares are quite wild enough to join in the "Wild Things" Simon Says Stamp Challenge this Monday.

Finally as the number 60 was the whole point of this card I am playing for the first time with Stampotique and thier current Challenge - "Number It"

Animal magic
Wild Things
Number It


Sunday, 10 June 2018

Sweetbriar Paper doll

At last got time today to do some stamping and blogging. After a week where I got no time I had all weekend to craft. Of course once I was free I could not get back into it at all. Sometimes everything seems to turn to mush.  I especially wanted to join in the Paperartsy theme this fortnight which was paper dolls. With only 3 hours I got out my old Sizzix fairy die and cut out the pieces from watercolour paper. A short deadline is never a good thing for creating and  I threw several attempts in the bin.
These were decorated with oxide inks and a little archival ink in darker colours to add some script details.
I used Lynne Perrella's Sweetbriar stamp to make the head of my paper lady adding colour to the flowers in her hair. Happily then I found I had perfect purple brads to assemble her with.
Next I cut and inked a bodice from German book paper and a skirt in watercolour paper. I used similar colours to add colour and pattern to these.
It is not the doll I set out to make but then that is often how it goes. If I can steal enough time this week I will keep going and make a few more.
Thanks for your visit and hope your muse is flowing.

Im entering this in Paperartsy Paper Dolls topic
Joining in with happylittlestampers Anything goes with dies
And another die cut challenge at MOO-MANIA 

Sunday, 29 April 2018

Kraft Card Tattered Florals

I spotted the latest Paperartsy challenge Kraft Card weeks ago but then  I was away from my desk all week ill and frustrated.  Today I'm delighted to get back to my studio and play with lots of layers all in Kraft. I have been meaning to get out my dies for a while and Had great fun with them this morning.

This card is made entirely in Kraft card with corrugated card flower centers. I have used lots of different Paperartsy and Lynne Perrella stamps on the flowers which are cut from Tim Holtz Tattered Floral Bigz die. The greenery is cut from Tim Holtz Garden Greens Bigz die and all the elements are stamped with archival ink then smooched in distress ink and finished with some Queens gold embossing powder.

 The card base is mounted on a  Kraft card. The sentiment is from an old Crafty Secrets stamp set Garden Girl. Thanks for looking.
Paperartsy Challenge #7. 2018 Kraft Card Paperartsy Challenge #7 2018
 Simon Says Stamp Monday Challenge theme is Flower Power so I will link it there too.SSS:


Wednesday, 11 April 2018

Happy Birthday Card

I was away for the weekend and missing crafting so Simon Says Stamp Wednesday challenge was a good incentive to spend the evening at my desk.
I made a background with distress inks in squeezed lemonade and mowed lawn distress ink then added some peeled paint round the edges. I finished off using dylusions leaf flourish stencil with peeled paint and mowed lawn distress ink and stamped text in leaf green archival ink. I die cut the Happy birthday and a Tim Holtz detailed butterfly in black card stock then coloured the background for the butterfly in orange and yellow distress ink. its mounted on a black card base. I am entering this in the Simon Says Stamp Wednesday Challenge where the theme is Happy birthday